Crafting has been a long-standing hobby of mine, and I've dabbled in a few DIY projects that are now proudly displayed in my room. It's a delightful pastime for those moments when you need to unwind or when you simply can't justify the high cost of store-bought items.
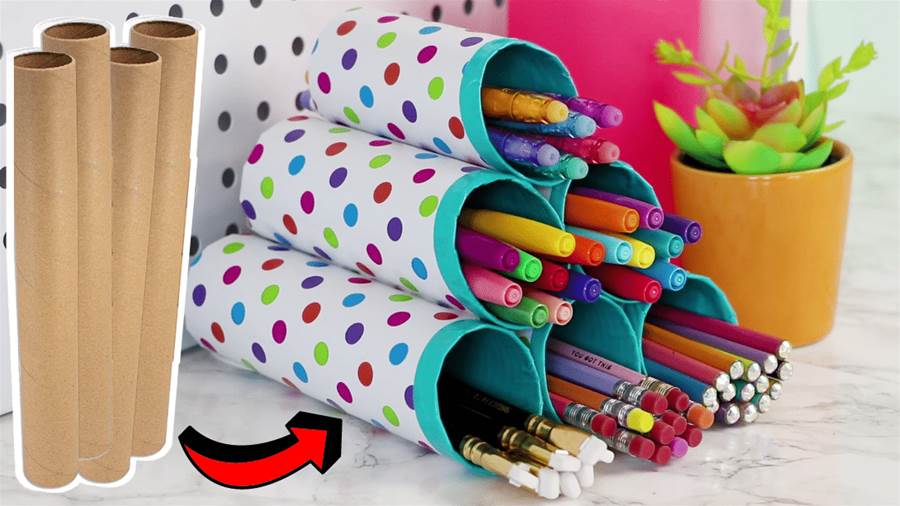
When seeking inspiration for my next creation, I often turn to the internet, and one recent favorite of mine is a tutorial by Karen Kavett on HGTV Handmade's YouTube channel. This particular project involves creating a charming cardboard organizer that boasts numerous compartments for storing small items. The best part? It's incredibly easy to put together.
For those interested in trying their hand at making a DIY Cardboard Tube Organizer, here's a list of materials you'll need:
- Empty wrapping paper tubes
- Saw or sharp utility knife
- Colored tape
- Contact paper
- Scissors
- Pencil
- Ruler
- Hot glue gun and glue sticks
Here's a step-by-step guide on how to make your very own DIY Cardboard Tube Organizer:
Step 1: Measure 5.5 inches on the tube and cut it using a saw or sharp utility knife. Then, measure an inch from one end and cut diagonally from that point. This will serve as the middle section. Repeat this process for another tube of the same size and create 3 pieces at 6.
5", 1 at 4.5", and 1 at 3.5".Step 2: Decorate each tube to your liking. In the video tutorial, tape was used to cover the interior, while the exterior was wrapped in contact paper. Additional tape was added to the diagonal edges for a decorative touch.
Step 3: After decorating the tubes, assemble them by hot gluing them together. Ensure that the longest tubes are at the bottom and the shortest tube is at the top, creating a pyramid-like structure with the straight edges aligned at the back.
Remember, all credit for these images goes to HGTV Handmade on YouTube. Be sure to check out their channel for more creative DIY ideas! Easy DIY Cardboard Tube Organizer Tutorial.